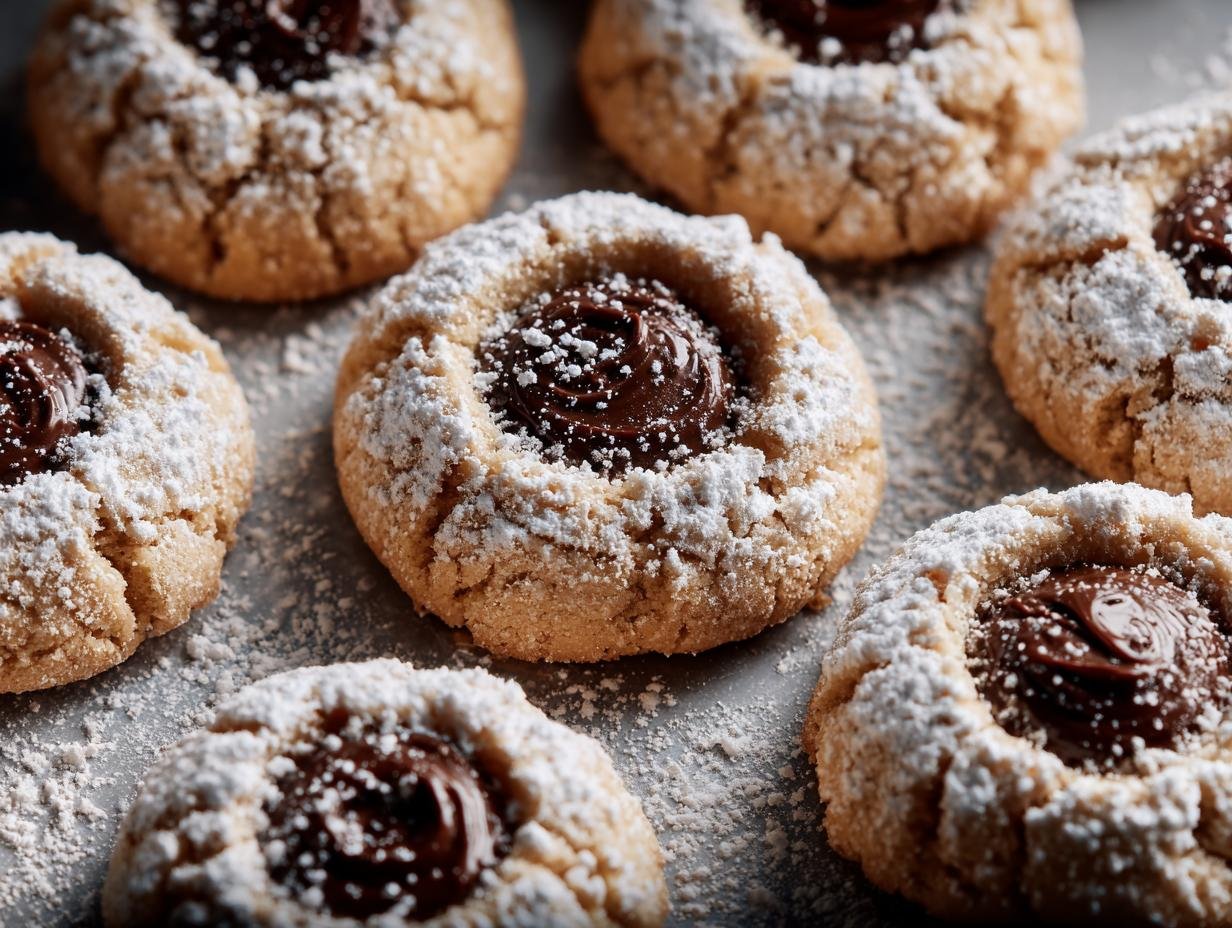
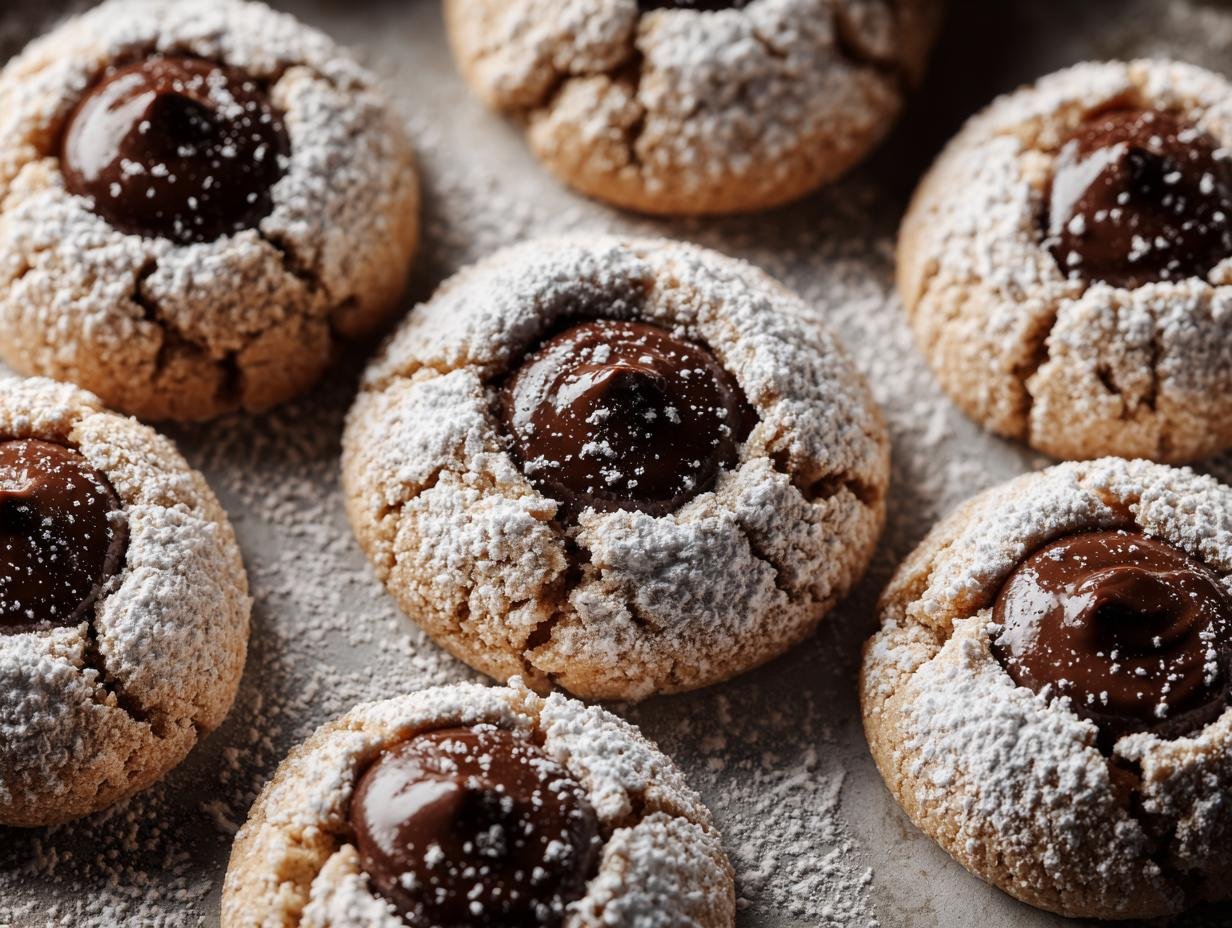
Nutella Thumbprints have a special place in my heart, and I’m so excited to share this easy Nutella thumbprint recipe with you! I remember the first time I ever tried one of these cookies – the combination of the buttery, nutty shortbread and the warm, gooey Nutella center was pure bliss. The aroma alone, a blend of toasted hazelnuts and rich chocolate, fills my kitchen with such a comforting warmth. These Nutella thumbprint cookies are simple enough for a weeknight treat but elegant enough for any holiday gathering. Let’s get baking!
Why You’ll Love These Nutella Thumbprints
These cookies are an absolute dream! Here’s why you’ll be making them again and again:
- Incredible Taste: A perfect balance of buttery, nutty shortbread and rich, creamy Nutella.
- Quick Prep Time: You can whip up the dough in just 15 minutes, making them perfect for a last-minute bake.
- Family Favorite: Kids and adults alike adore these classic cookies, and they’re incredibly fun to make together.
- Budget-Friendly: Most ingredients are pantry staples, making these a cost-effective treat.
- Versatile Treat: These thumbprint cookies with Nutella are perfect for holiday cookie platters, afternoon snacks, or even a special dessert.
- Impressive Presentation: The simple dusting of powdered sugar makes these cookies look professionally made.
- Satisfyingly Simple: The straightforward nature of these thumbprint cookies with Nutella means even beginner bakers can achieve delicious results.
Ingredients for Nutella Thumbprints
Gathering your Nutella thumbprint cookie ingredients is the first step to baking these delightful treats. You’ll need:
- 1 cup all-purpose flour – the base for our tender shortbread
- 3/4 cup ground hazelnuts – these give our cookies that signature nutty flavor and tender crumb
- 1/2 cup unsalted butter, softened – crucial for a creamy, melt-in-your-mouth texture
- 1/3 cup granulated sugar – for sweetness and a lovely crisp edge
- 1 egg yolk – this adds richness and helps bind the dough
- 1 tsp pure vanilla extract – enhances all the other flavors
- A pinch of salt – balances the sweetness and deepens the nutty notes
- 1/2 cup Nutella – the star of the show, creating that luscious chocolate-hazelnut center
- Powdered sugar, for dusting – for that classic, elegant finish
How to Make Nutella Thumbprint Cookies
Follow these simple Nutella thumbprint cookie instructions for the most delicious results. Baking these classic cookies is a joy!
- Step 1: Let’s get started by preheating your oven to 350°F (175°C). Line a baking sheet with parchment paper; this prevents sticking and makes cleanup a breeze.
- Step 2: In a medium bowl, cream together the softened unsalted butter and granulated sugar. Beat them until the mixture is light, pale, and fluffy – about 2 to 3 minutes. This step is key for that melt-in-your-mouth texture.
- Step 3: Scrape down the sides of the bowl to ensure everything is incorporated. Add the egg yolk and pure vanilla extract, then beat until the mixture is combined and smooth.
- Step 4: In a separate bowl, whisk together the all-purpose flour, ground hazelnuts, and salt. This dry mix forms the tender cookie base.
- Step 5: Gradually add the dry ingredients to the wet ingredients. Mix on low speed just until the dough comes together without any dry streaks. Be careful not to overmix!
- Step 6: Scoop about a tablespoon of dough and carefully roll it into a 1-inch ball. Place these dough balls on the prepared baking sheet, ensuring they are about 2 inches apart to allow for spreading during baking.
- Step 7: Now for the thumbprint! Use your thumb to press a nice indent into the center of each dough ball. If the dough sticks to your thumb, just lightly dust it with a bit of flour.
- Step 8: Time for Nutella thumbprint cookie baking! Bake for 10 to 12 minutes, or until the edges are lightly golden brown. The centers should still look soft and slightly underdone; they’ll firm up as they cool.
- Step 9: Once baked, let the cookies cool on the baking sheet for at least 10 minutes. This allows them to set properly. Then, carefully transfer them to a wire rack to cool completely.
- Step 10: Once the cookies are completely cool, it’s time for the best part – filling the indents with Nutella! Gently warming the Nutella slightly can make it easier to spoon or pipe into each cookie.
- Step 11: Finally, dust the finished Nutella thumbprint cookies generously with powdered sugar for that classic, elegant look. Enjoy your homemade delights!

Pro Tips for the Best Nutella Thumbprint Cookies
Want to make sure your cookies are absolutely perfect? Here are my best Nutella thumbprint cookie tips:
- Toast your hazelnuts before grinding them. This really brings out their rich, nutty flavor and adds a wonderful depth to the cookie base.
- Don’t overmix the dough once you add the flour and hazelnuts. Overmixing can lead to tough cookies, and we want them to be tender and melt-in-your-mouth!
- Re-press the indents halfway through baking if they start to puff up. This ensures you have a nice little well for that delicious Nutella center.
- Let the cookies cool completely before adding the Nutella. If they’re still warm, the Nutella can melt and become too runny, making a mess.
What’s the secret to perfect Nutella thumbprints?
The secret to perfect Nutella thumbprints is in the dough and the bake. Toasting the hazelnuts and ensuring you don’t overmix the dough are crucial steps. Also, baking until the edges are just golden but the centers still look soft is key for that signature melt-in-your-mouth texture. For more baking insights, check out these tips on the beauty of food.
Can I make Nutella thumbprint cookies ahead of time?
Yes, you absolutely can! The Nutella thumbprint cookie dough can be made up to 2 days ahead and refrigerated, or frozen for up to 3 months. Just wrap it well. You can also form the balls and make the indents, then freeze them before baking. Bake from frozen, adding a few extra minutes.
How do I avoid common mistakes with Nutella thumbprint cookies?
To avoid common pitfalls and ensure you have the best Nutella thumbprint cookies, don’t overmix the dough. Also, make sure to cool the cookies completely before filling them with Nutella. If the dough is too crumbly, a tiny bit of extra liquid can help bind it together, but add it sparingly. Learn more about making delicious desserts.
Best Ways to Serve Nutella Thumbprint Cookies
These delightful cookies are so versatile! They’re perfect on their own, of course, but I love serving them with a tall glass of cold milk for a classic treat. For a more sophisticated dessert, consider pairing these chocolate hazelnut thumbprint cookies with a scoop of vanilla bean ice cream or a dollop of fresh whipped cream. They also make a beautiful addition to any holiday cookie platter, offering that irresistible chocolate-hazelnut flavor that everyone adores. You might also enjoy our Pistachio Pavlova Meringue Cakes for another elegant dessert option.
Nutrition Facts for Nutella Thumbprints
Here’s a look at the nutritional breakdown for these delicious cookies. These numbers are based on the standard recipe and serving size.
- Calories: 130 kcal
- Fat: 8g
- Saturated Fat: N/A
- Protein: 2g
- Carbohydrates: 14g
- Fiber: N/A
- Sugar: 8g
- Sodium: N/A
Nutritional values are estimates and may vary based on specific ingredients used.
How to Store and Reheat Homemade Nutella Thumbprint Cookies
Storing these delightful cookies properly ensures they stay fresh and delicious. Once your Nutella thumbprint cookies have cooled completely, store them in an airtight container at room temperature for up to 3-4 days. I find that placing a small piece of parchment paper between layers helps prevent them from sticking together.
For longer storage, these cookies freeze beautifully. Wrap them tightly, first in plastic wrap and then in foil or a freezer-safe bag, and they’ll keep for up to 3 months. When you’re ready to enjoy them, thaw them overnight in the refrigerator. If you want to reheat them slightly to bring back that gooey Nutella center, you can pop them in a warm oven (around 250°F or 120°C) for just a few minutes until warmed through. For more storage tips, consider reading about barley storage as an example of preserving ingredients.
Frequently Asked Questions About Nutella Thumbprints
What makes these Nutella thumbprint cookies so special?
The magic of these Nutella thumbprint cookies lies in their delicate balance of flavors and textures. The shortbread base, enriched with ground hazelnuts, offers a tender, buttery crumb with a delightful nutty undertone. This pairs perfectly with the rich, creamy Nutella center, creating a truly irresistible combination that sets them apart.
Can I use a different nut butter in this Nutella cookie thumbprint recipe?
While this Nutella cookie thumbprint recipe is designed for the classic chocolate-hazelnut spread, you can experiment! Peanut butter or almond butter can work, but keep in mind they have different flavor profiles and consistencies. You might need to adjust the amount slightly to ensure the thumbprint wells are filled perfectly. For inspiration on other spreads, check out this avocado toast recipe which uses a different kind of spread.
How do I get the perfect thumbprint indentation?
To achieve that signature thumbprint, start by rolling the dough into a 1-inch ball. When you press your thumb in, aim for a consistent depth that goes about halfway through the dough ball. If the dough sticks to your thumb, a light dusting of flour or a quick dip in a tiny bit of water can help prevent sticking and create a cleaner indent.
Are these Nutella thumbprint cookies good for shipping?
Yes, these Nutella thumbprint cookies are surprisingly sturdy and travel well, making them a great option for sending to friends and family. Once completely cooled, fill them with Nutella and dust with powdered sugar. Pack them carefully in a tin or sturdy box with cushioning material to prevent them from breaking during transit.
Variations of Nutella Thumbprints You Can Try
Once you’ve mastered the classic, get ready to explore some fun Nutella thumbprint cookie variations! These simple tweaks can completely change the flavor profile and make them even more exciting.
- White Chocolate Drizzle: After the cookies have cooled and the Nutella is set, drizzle melted white chocolate over the top. This adds a lovely contrast in flavor and appearance.
- Raspberry Jam Centers: For a fruity twist, try filling half of your thumbprint cookies with raspberry jam instead of Nutella. The tartness of the raspberry pairs wonderfully with the buttery cookie.
- Salted Caramel Filling: Swap the Nutella for a rich, salted caramel sauce for a decadent treat. Make sure the caramel is thick enough not to run out during baking or cooling.
- Gluten-Free Option: If you need gluten-free Nutella thumbprint cookies, simply substitute the all-purpose flour with a good quality 1:1 gluten-free baking blend. The ground hazelnuts also add a lovely texture that works well with gluten-free baking.
Nutella Thumbprints: Pure Bliss Cookie Magic

These Nutella Thumbprint cookies feature a soft, melt-in-your-mouth shortbread base made with ground hazelnuts, a rich dollop of creamy Nutella in the center, and a final dusting of powdered sugar. They are simple, elegant, and perfect for any occasion.
- Prep Time: 15 minutes
- Cook Time: 12 minutes
- Total Time: 30 minutes
- Yield: 24 cookies 1x
- Category: Cookies
- Method: Baking
- Cuisine: American
- Diet: Vegetarian
Ingredients
- 1 cup all-purpose flour
- 3/4 cup ground hazelnuts
- 1/2 cup unsalted butter, softened
- 1/3 cup granulated sugar
- 1 egg yolk
- 1 tsp pure vanilla extract
- A pinch of salt
- 1/2 cup Nutella
- Powdered sugar, for dusting
Instructions
- Preheat your oven to 350°F (175°C). Line a baking sheet with parchment paper.
- In a medium bowl, cream together the softened butter and granulated sugar until the mixture is light, pale, and fluffy, about 2-3 minutes.
- Scrape down the sides of the bowl. Add the egg yolk and vanilla extract, and beat until combined and smooth.
- In a separate bowl, whisk together the flour, ground hazelnuts, and salt.
- Gradually add the dry ingredients to the wet ingredients, mixing on low speed just until the dough comes together without any dry streaks.
- Scoop about a tablespoon of dough and roll it into a 1-inch ball. Place the balls on the prepared baking sheet, about 2 inches apart.
- Use your thumb to press an indent into the center of each dough ball. If the dough sticks, lightly dust your thumb with flour.
- Bake for 10-12 minutes, or until the edges are lightly golden brown. The centers should still look soft.
- Let the cookies cool on the baking sheet for at least 10 minutes before transferring them to a wire rack to cool completely.
- Once completely cool, fill each indent with Nutella. Gently warming the Nutella slightly can make it easier to spoon or pipe.
- Dust the finished Nutella thumbprint cookies generously with powdered sugar.
Notes
- For gluten-free Nutella thumbprint cookies, use a 1:1 gluten-free baking blend instead of all-purpose flour.
- To enhance the nutty flavor, toast the hazelnuts before grinding them.
- If the dough is too crumbly, add a teaspoon of cold water or milk at a time until it comes together.
- The dough can be made ahead and refrigerated for up to 2 days or frozen for up to 3 months.
- To prevent the thumbprints from puffing up, re-press the indents with the back of a teaspoon halfway through baking.
- Using a piping bag for the Nutella filling ensures a clean and professional finish.
Nutrition
- Serving Size: 1 cookie
- Calories: 130 kcal
- Sugar: 8g
- Sodium: N/A
- Fat: 8g
- Saturated Fat: N/A
- Unsaturated Fat: N/A
- Trans Fat: N/A
- Carbohydrates: 14g
- Fiber: N/A
- Protein: 2g
- Cholesterol: N/A


Leave a Reply