
Sushi cups have been my secret weapon for weeknight dinners and impromptu gatherings ever since I discovered them! They’re such a fun, bite-sized twist on traditional sushi, and the fact that you can make them entirely from scratch is amazing. I remember the first time I tried making this easy sushi cup recipe; the smell of the seasoned rice and the vibrant colors of the toppings filled my kitchen with such happy energy. If you’re looking for a delightful ‘sushi in a cup’ variation that’s both impressive and incredibly simple, you’ve come to the right place. Let’s get cooking!
Why You’ll Love This Sushi Cup Recipe
You’ll be obsessed with these sushi cups for so many reasons!
- Incredible flavor: A perfect balance of savory, tangy, and fresh tastes.
- Super speedy prep: Ready in about 20 minutes, making them perfect for busy nights.
- Healthy and light: Packed with lean protein and fresh ingredients.
- Budget-friendly fun: Much cheaper than takeout sushi, and you control the ingredients.
- Family-approved: Kids love assembling their own, making it a fun family activity.
- Versatile appetizer: This sushi cup appetizer is always a crowd-pleaser at parties.
- Great for lunches: Pack them up for a delicious and satisfying sushi cup appetizer.
Ingredients for Sushi Cups
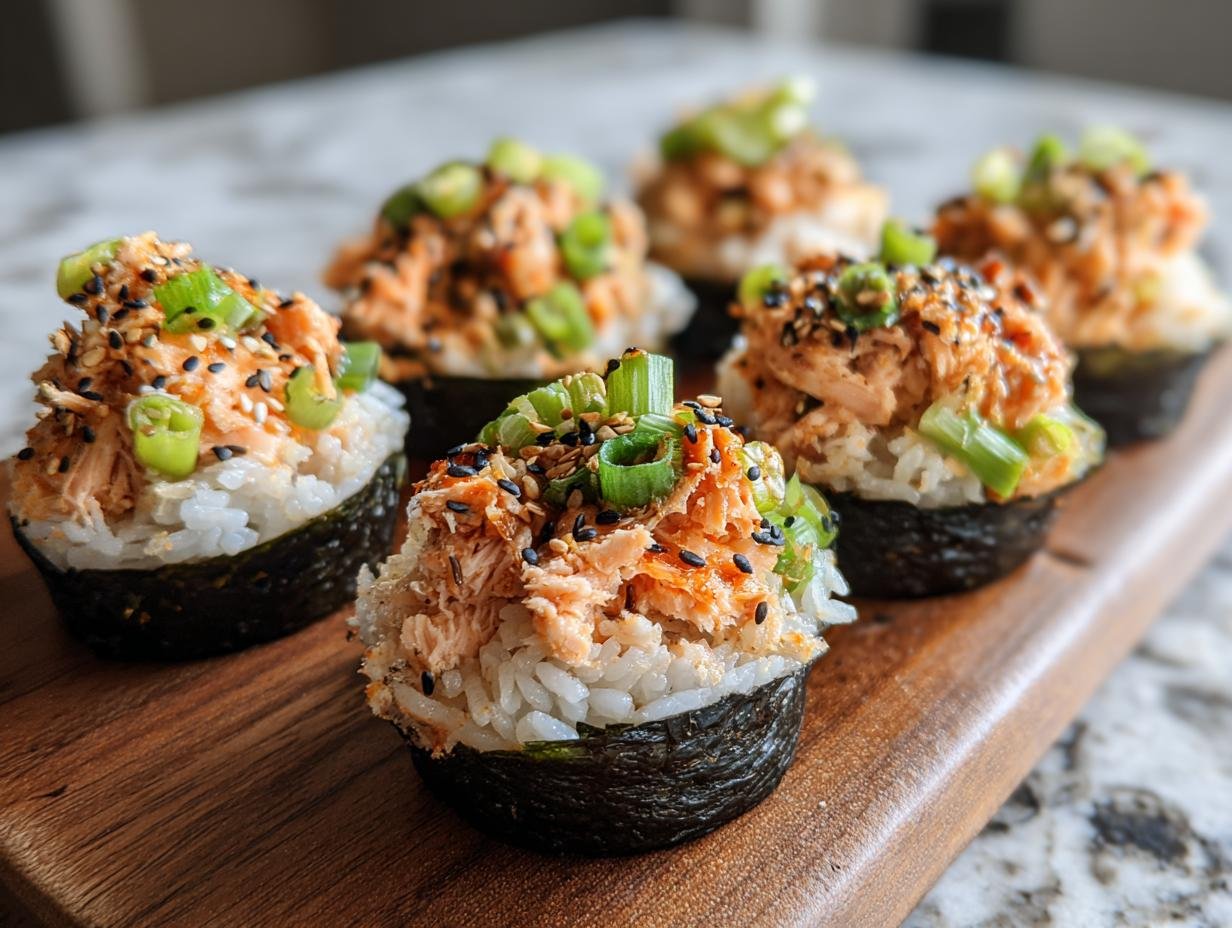
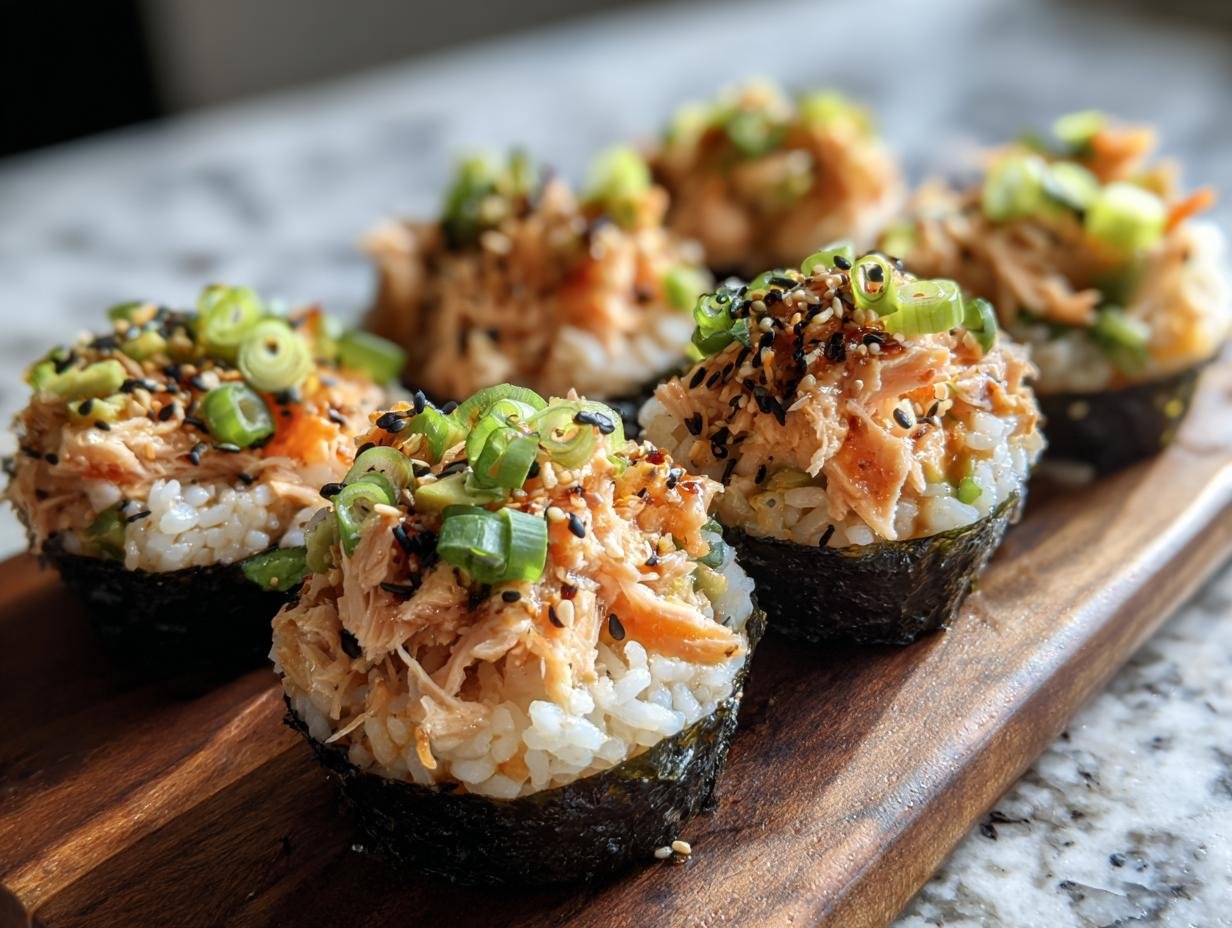
Gathering your sushi cup ingredients is the first step to creating these delightful bites. The foundation is 2 cups cooked sushi rice, which should be warm when you season it. For that essential sushi rice flavor, you’ll need 3 tbsp rice vinegar, 1 tbsp sugar, and 1 tsp salt. These create the perfect tangy and slightly sweet seasoning. You’ll also need 1 sheet nori, cut into squares, which acts as the cup liner. For the filling, we have 8 oz (225 g) cooked salmon, flaked, mixed with 2 tbsp mayonnaise for creaminess, 1 tsp soy sauce for savory depth, and 1 tsp sesame oil for a nutty aroma. Finally, a sprinkle of 1 green onion, finely sliced, and 1 tsp sesame seeds adds freshness and texture.
How to Make Sushi Cups
Ready to learn how to make sushi cups? It’s a straightforward process that yields incredibly satisfying results. Let’s dive in!
- Step 1: Start by seasoning your sushi rice. Gently mix 3 tbsp rice vinegar, 1 tbsp sugar, and 1 tsp salt into your warm, cooked sushi rice. Stir carefully to avoid mushing the grains, aiming for a slightly sticky texture. Let it cool for about 10 minutes until it’s just warm to the touch.
- Step 2: Prepare the delicious salmon filling. In a medium bowl, combine the 8 oz (225 g) cooked salmon, flaked, with 2 tbsp mayonnaise, 1 tsp soy sauce, and 1 tsp sesame oil. Stir everything together until well combined. The aroma of the sesame oil is just wonderful! Stir in the 1 finely sliced green onion.
- Step 3: Assemble your cups. Take your 1 sheet nori, cut into squares, and press one square into each cup of a mini muffin tin. You want the nori to line the sides and bottom. Add about 1 tbsp of the seasoned sushi rice into each nori-lined cup, pressing it down gently with your fingers or a small spoon to form a base. This is key for how to make sushi cups that hold their shape.
- Step 4: Top with the salmon mixture. Spoon about 1-2 tablespoons of the salmon filling evenly over the rice in each cup. Don’t overfill them, but make sure you get a nice generous portion of that flavorful topping.
- Step 5: Garnish and serve. Sprinkle the tops with 1 tsp sesame seeds for a lovely nutty crunch. Now’s the time to add any optional toppings you love, like diced avocado, thinly sliced cucumber, or a dab of sriracha for a little heat.
- Step 6: Serve immediately for the best experience. These sushi cups are best enjoyed fresh, as the nori will stay crisp and the rice will have the perfect texture.
Pro Tips for the Best Sushi Cups
Want to elevate your sushi cup game? I’ve picked up a few tricks over time that make all the difference for these delightful bites.
- Rice is key: Make sure your sushi rice is perfectly seasoned and slightly sticky before pressing it into the nori. This ensures it holds its shape.
- Nori crispness: For the crispiest nori, assemble your sushi cups just before serving. If you need to prep ahead slightly, press the rice into the nori and let it sit for a few minutes to slightly soften the nori before adding the filling.
- Don’t overfill: Resist the urge to pack too much filling into each cup. A balanced ratio of rice to filling makes for a better bite.
- Flavor boosts: Experiment with different sauces and spices in your fillings. A touch of chili garlic sauce or a drizzle of eel sauce can add amazing depth.
What’s the secret to perfect sushi cups?
The secret to perfect sushi cups lies in the rice-to-nori ratio and the moisture content. I find that pressing the seasoned rice firmly into the nori liner creates a stable base, preventing a messy, layered sushi cup. It’s all about that neat, contained structure. For more on rice preparation, check out this guide on grains.
Can I make sushi cups ahead of time?
You can prepare the rice and filling a few hours in advance and store them separately in the refrigerator. However, for the best texture, especially the crispness of the nori, I recommend assembling them closer to serving time. They are best enjoyed fresh.
How do I avoid common mistakes with sushi cups?
A common mistake is using dry rice, which won’t stick together. Always season warm rice. Another pitfall is soggy nori; avoid assembling too far in advance. Lastly, don’t overmix your fillings; keep the ingredients distinct for the best flavor and texture.
Best Ways to Serve Sushi Cups
These delightful sushi cups are incredibly versatile, perfect for so many occasions! For parties, they make fantastic bite-sized appetizers that guests can easily grab and enjoy while mingling. You can arrange them on a platter with a side of soy sauce and wasabi for dipping. For a more substantial meal, consider serving them alongside a light miso soup or a fresh cucumber salad. If you’re craving that sushi bowl experience but want something more manageable, think of these as deconstructed sushi cups that offer all the flavor in a fun, individual format. They also pair wonderfully with a simple side of edamame, making for a complete and satisfying meal.
Nutrition Facts for Sushi Cups
When enjoying these delicious sushi cups, it’s helpful to know what you’re getting. A single serving, which is one sushi cup, typically offers around 90 kcal. You’ll find about 3g of fat in each serving. For protein, each cup provides roughly 4g. The carbohydrate count is about 11g. While specific fiber content can vary based on toppings, it’s generally minimal in the base recipe. Details on sugar and sodium can also fluctuate depending on the soy sauce and any added seasonings or toppings you choose. Nutritional values are estimates and may vary based on specific ingredients used. For more information on healthy eating, you can explore resources on sustainable farming.
How to Store and Reheat Sushi Cups
Properly storing and reheating your sushi cups is key to enjoying them later, especially if you’re prepping them for a sushi cup for lunch. After assembling and before they’ve sat out too long, let them cool completely to room temperature. Then, transfer them to an airtight container. They’ll keep well in the refrigerator for about 3 to 4 days. If you need to store them for longer, you can freeze them for up to 3 months. For freezing, I like to wrap each individual cup tightly in plastic wrap, then place them in a freezer-safe bag to prevent freezer burn. Reheating is best done gently; for refrigerated cups, you can enjoy them cold or let them sit at room temperature for 15 minutes. Frozen cups should be thawed overnight in the refrigerator before enjoying them cold or warming them slightly in a microwave on low power for just a few seconds – you don’t want to cook them, just take the chill off.
Frequently Asked Questions About Sushi Cups
What is a sushi cup?
A sushi cup is essentially a bite-sized, deconstructed version of traditional sushi, presented in a cup-like form. Instead of rolling, the seasoned sushi rice is pressed into a small cup shape, often lined with a piece of nori, and then topped with various sushi fillings. They’re a fun and easy way to enjoy sushi flavors without the rolling technique, making them incredibly accessible for home cooks.
Why are sushi cups popular?
The popularity of sushi cups stems from their sheer convenience and adaptability. They skip the sometimes tricky sushi-rolling process, making them a fantastic option for beginners and busy individuals. Plus, their customizable nature means you can tailor them to any taste preference or dietary need, whether you’re making a spicy tuna sushi cup or a vegetarian sushi cup recipe. They’re also visually appealing and perfect for parties, offering a neat, individual serving of sushi goodness.
Can I use different types of fish or protein?
Absolutely! While this recipe uses salmon, you can easily swap it out for other cooked fish like tuna or shrimp. For a vegetarian sushi cup recipe, try using marinated tofu, edamame, or finely chopped shiitake mushrooms. The key is to ensure your protein is cooked and cut into small, manageable pieces for the best flavor and texture in your sushi cups.
How do I get the nori to stay crisp?
To maintain that delightful crispness in your sushi cups, the best approach is to assemble them as close to serving time as possible. If you absolutely need to prep ahead, you can press the seasoned rice into the nori cups and let them sit for about 10-15 minutes before adding the topping. This allows the moisture from the rice to slightly soften the nori, acting as a barrier and helping it hold its shape without becoming overly soggy.
Variations of Sushi Cups You Can Try
Once you’ve mastered the basic recipe, you’ll love exploring all the different ways to customize your sushi cups! These variations offer something for everyone.
- Vegetarian Delight: For a fantastic vegetarian sushi cup recipe, swap the salmon for seasoned, pan-fried tofu cubes or a mix of edamame and finely chopped cucumber. Marinate the tofu in soy sauce, ginger, and a touch of sesame oil for extra flavor.
- Spicy Kick: Craving something with a bit more heat? Create a delicious spicy tuna sushi cup by mixing canned tuna (drained well) with spicy mayo (mayonnaise mixed with sriracha) and a dash of soy sauce. You can also add a pinch of chili flakes to the salmon filling for a similar effect.
- Deconstructed Sushi Bowl Style: If you’re short on time or don’t have a mini muffin tin, think of these as a sushi bowl recipe in miniature. Simply layer the seasoned rice and your chosen toppings in small bowls or even shot glasses for a fun, edible presentation.
- Cucumber Cups: For a lower-carb or gluten-free option, try using thin slices of cucumber as your cup base instead of nori. Simply press the rice into the cucumber slice and top as usual.
Sushi Cups: 20-Minute Delight

A fun, bite-sized twist on sushi! These sushi cups are simple to assemble, customizable, and perfect for parties, lunches, or a light dinner. Fresh, flavorful, and endlessly versatile!
- Prep Time: 20 minutes
- Cook Time: 5 minutes
- Total Time: 25 minutes
- Yield: ~12 sushi cups
- Category: Appetizers
- Method: No-Bake
- Cuisine: Japanese-Inspired
- Diet: Vegetarian
Ingredients
- 2 cups cooked sushi rice
- 3 tbsp rice vinegar
- 1 tbsp sugar
- 1 tsp salt
- 1 sheet nori, cut into squares
- 8 oz (225 g) cooked salmon, flaked
- 2 tbsp mayonnaise
- 1 tsp soy sauce
- 1 tsp sesame oil
- 1 green onion, finely sliced
- 1 tsp sesame seeds
- Optional toppings: avocado, cucumber, pickled ginger, sriracha
Instructions
- Season rice: Mix rice vinegar, sugar, and salt into warm sushi rice. Let cool slightly.
- Prepare filling: Combine salmon with mayo, soy sauce, and sesame oil. Stir in green onion.
- Assemble cups: Line mini muffin tin with nori squares. Add 1 tbsp rice to each, pressing gently.
- Top with filling: Spoon salmon mixture over rice.
- Garnish: Sprinkle with sesame seeds and add optional toppings.
- Serve & enjoy immediately for best texture.
Notes
- For a low-carb option, use thin slices of cucumber or jicama as the cup base.
- Mix mayonnaise with sriracha for an easy spicy mayo.
- Use tamari for a gluten-free version of soy sauce.
- Assemble as close to serving time as possible to keep nori crisp.
- If you don’t have a mini muffin tin, you can free-form the cups on a plate.
Nutrition
- Serving Size: 1 sushi cup
- Calories: 90 kcal
- Sugar: N/A
- Sodium: N/A
- Fat: 3g
- Saturated Fat: N/A
- Unsaturated Fat: N/A
- Trans Fat: N/A
- Carbohydrates: 11g
- Fiber: N/A
- Protein: 4g
- Cholesterol: N/A


Leave a Reply